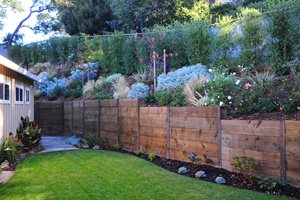
Backyards
 Front Yards
How to Build Retaining Walls
Understanding the basics of retaining wall constructionThe majority of retaining walls built today utilize manufactured concrete units, or what is known generically as a segmented retaining wall system. These are actually block systems designed to integrate together into a solid and very strong wall. They are typically less than four feet tall. Early block systems were limited to a battered wall, which leans back toward the slope for added strength. Newer systems utilize new connector design which allows them to be entirely vertical.
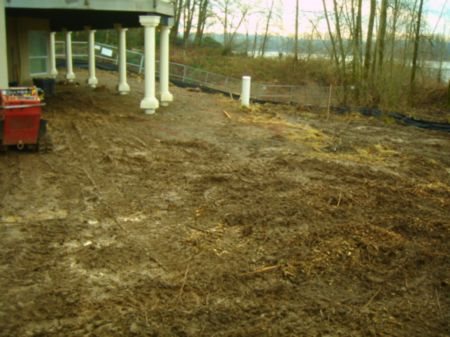 Before.
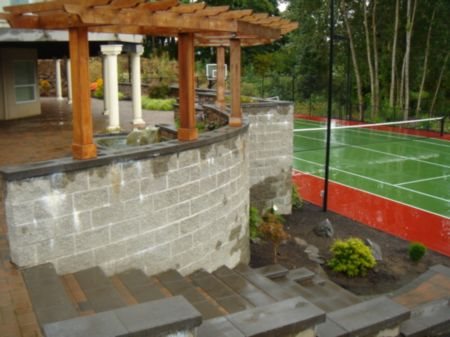 After.
Each individual manufacturer will utilize their own preferred anchorage system, which is reflected in the shape of the back side of the block that isn't visible in the end product. There's a good deal of variety in this area, with some companies requiring steel or PVC pins to anchor each block deep into the ground. Other types create large pockets in the block so these become part of the slope to provide anchorage.
Geotextiles are important because they control lateral pressure stabilization that attaches the wall to the slope behind it. These sheets of gridded plastic are vital to preventing bowing of the wall in the future. The variety of block designs and the use of geotextiles provide unique solutions to different sites with problem soils or extreme climatic conditions. What they all share, however, is the same basic installation process.
Time / 01:42
Discover how the right retaining wall design can add structure and beauty to a sloped landscape
Step by Step Installation of a Retaining Wall System
Step 1 - Dig an anchor trench to the dept specified by the manufacturer to provide a gravel base that sets the first course of block at the designated level, which is usually a few inches below grade.
Step 2 - Lay and level the first course of block. This course is the most important and sets the base for the entire wall, so a string line for accuracy is vital to proper level.
Step 3 - Lay second course. At this point a variety of things may happen at the same time because drainage structures often here in order to gather water at the lowest point.
Step 4 - Install drainage structures. At the second course the contractor will lay more gravel and set a corrugated perforated drain pipe spanning the entire length of the wall. He may also install the base of a waterproof membrane or filter fabric against the slope to further protect the wall from hydrostatic pressure.
Step 5 - Install structural backfill. Some kinds of block require a special porous structural backfill that's a lot like concrete which binds blocks. For other types, gravel may be added as courses are laid.
Step 6 - Apply geogrid with additional courses. A geogrid may be used to act as a deadman to help stabilize the wall. This flexible plastic grid is laid on top of a course and the corresponding gravel layer extending all the way back to the slope. The next layer of block and gravel is laid on top of the geogrid, and this may be repeated at designated intervals specified by engineer, manufacturer or landscape architect.
Step 7 - Apply capstone. When the wall reaches its designated height, a capstone will be attached to the last course of block to seal it against rain and runoff.

A raised patio created by retaining walls will be subject to building safety codes. When the patio is 30" above the surrounding grade or higher, it requires a railing as shown here. For those who find a railing unattractive, there is the option of integrating a seatwall into the top of the retaining wall instead. The cost options for each should be investigated before making a decision, and be sure to verify whether local building codes will accept a seatwall in lieu of railing.
Design and Building Codes
Retaining wall design varies in both method of construction and alignment. Both influence strength and visual appeal within a landscape. All retaining walls must conform to local building codes which can vary by region, climate and soil conditions.
Walnut Creek based landscape architect Joseph Heuttl deals with earthquake codes every day. "Here in California, and in particularly the San Francisco Bay Area where we're located, they update the earthquake building codes every few years. Today's walls may be over-designed for this reason. It's not that bad but it can put these walls out of reach to the consumer. A soils engineer may be used in addition to a structural engineer."
Wall height regulations are typically measured from grade at the face of the wall to its top. In some communities this may vary as well. "Under these more stringent regulations, walls over 3' tall must be engineered. Some communities allow four feet without engineering, but that's provided the wall isn't too close to habitable structures and the slope isn't too severe. We have a hard time in some cities where they measure wall height from the bottom of the footing to the top of the wall. That demands engineering for just about any kind of retaining wall."