Backyards
 Front Yards
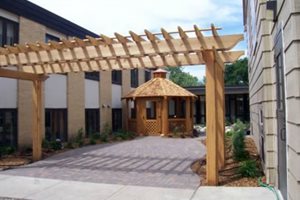
How to Build a Pergola
An overview of the pergola construction process
-
How to Build A Fence - Nine steps for installing a simple wood board fence
-
How to Install Sprinklers - Get an overview of the sprinkler installation process
-
How to Plant a Tree - Seven steps for planting a tree that will live for decades
The construction process for pergolas varies from project to project, depending on factors like whether your pergola is attached or detached from the home, has an open or solid roof, and what materials are being used. Here, landscape professionals talk about the basic process for installing a simple detached wooden pergola.
The step-by-step installation process
- Make decisions
Alison Terry, a landscape architect in Fullerton, CA says the first step is to discuss your needs with a landscape architect or contractor, so they can help you figure out the best location, size, materials and design for your pergola. Do you want a solid roof or lattice? Will you run utilities so you can watch TV, cook, or have lighting in your pergola? - Check with the city
“100 square feet or smaller is usually small enough to do without a permit,” says Terry, “but you should check with your local planning and building departments to be sure.” They may ask about size and height, setbacks from the property line, and the fire rating of the building materials, among other aspects. - Create a written design
This is especially important if your pergola will be complex enough to require engineering or a permit, but it also helps you visualize the project so you can be sure it fits with your home and landscape. - Purchase supplies and cut wood.
The first step in the actual construction process is to purchase, measure, and cut materials to the right size. - Paint wood with primer
If you plan to paint your pergola, Terry points out that it’s smart to prime the pieces before construction starts. “Make sure your contractor has enough room and a non-dusty space on-site where they can paint,” she advises. - Install footings and posts
Your climate and the size of your structure will determine how deep the posts go down. “In North Dakota we have very cold winters,” says Ryan Aakre of Signature Landscapes Inc. in Fargo, ND, “so we dig the posts four feet deep so they’re below the frost level, and use cement to hold them in place.” Make sure the posts are level and plumb so your structure will sit straight. - Stub out utilities
Whether you want line-voltage electricity, low-voltage lighting, or cable TV, now’s the time to make sure those lines are ready for your contractor to incorporate into the structure. “We hide utilities in the columns by wrapping the posts with wood,” says Terry. “Then we add switches inside the house or the patio cover.” - Wrap posts
Aakre uses pressure-treated posts because they last a long time and are an inexpensive base, but he wraps the posts with 1” by 1” cedar so they have the look of a natural, high-quality wood. Dan Berger of LandPlan's Landscaping, Inc. in Pleasanton, CA takes a similar approach by using decorative clamshells, or column wraps, from manufacturers like Outwater Plastics Industries. - Attach beams
Aakre recommends using a double runner, which is to say he runs a beam on both sides of the posts to ensure the beams can hold up the rafters. Thus, a pergola with four posts would have four beams as well; two on each end. Use carriage bolts to hold the beams in place. - Notch beams where the rafters will go
“I notch the beams so the rafters feel like they fit in,” says Aakre. - Install rafters
2” by 8” rafters are then attached to the beams with 12-16” spacing, depending on how much shade you need. Be sure to countersink the rafters into the beams. - Lay lattice or stringers
The last step in construction is to attach lattice or stringers (small strips of wood) to the roof. They give a filtered effect to the light, creating additional shade for hot climates. - Paint or stain the wood
The last step is to put the finishing touches onto your pergola by painting or staining it the color of your choice.
The step-by-step installation process
The question of whether or not to hire a professional to install your pergola is based on the complexity of the project and your experience with construction. “It comes down to whether you have the proper tools and manpower,” says Aakre. “The logistics of the project require at least two people to construct even the most basic pergola.”
The design can also pose a challenge. “If you look at building a structure holistically, it has to flow with traffic and everything else that’s happening in the landscape,” Berger points out. “A pro sees all of that and can help you integrate the structure into the landscape.” In addition, a professional will be able to look at your site and your budget and come up with new ideas to make the most of both. “Pros also know the local building codes,” says Berger. They can help you work creatively within those constraints to get the best landscape possible.
Baron Biedenweg from Archadeck of Fort Wayne, IN says, “Building a simple project is not rocket science. Can you do it yourself? Absolutely. But to get it right and know that in five years and beyond, your project will still be looking as good as the day it was installed - that’s why people hire a pro.”
- Pro Tip: If you live in an area with a deep frost line, anchor the posts of your pergola in concrete to ensure that they are not pushed out of place by freezing groundwater.
Pitfalls to avoid
- Wrong size of footer.
The depth of the posts and size of the footer, or amount of concrete poured to hold the posts in place, is critically important because that’s the base on which your pergola stands. If the posts and footers aren’t secure enough, the structure could lean or sink in time, particularly in cold climates where the frost can heave things out of the ground. - Design doesn’t feel integrated.
A pergola should be an inviting place where you want to entertain and spend time with family and friends. A dinky structure that was plunked into the landscape with little thought to the architecture of the home or the style of the surrounding landscape won’t feel inviting and may even be an eyesore. Don’t neglect planning when building your pergola. - Wrong beam span.
If your beams aren’t sturdy enough to hold up your structure, the pergola can start to sag in the middle. A sagging roof is a common pitfall with larger projects that should have involved a professional. “We’ve replaced a few of those,” says Biedenweg.