
Outdoor Tile Installation
A step-by-step overview of how to lay tile outdoors

-
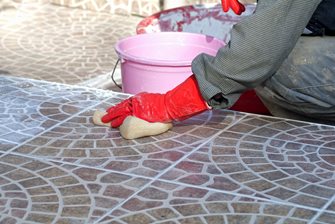 Once the grout has dried, a sponge should be used to wipe away any grout haze on the surface of the tiles.

Popular Links
Pouring Concrete - Preparing, pouring & finishing concrete
Installing Pavers - A step-by-step guide to laying pavers
Laying Flagstone - Learn how to install flagstone
Tile is well suited to a variety of applications in outdoor living spaces and other specialty parts of a larger landscape project. For this reason there are many variables that influence how it's done, but if you consider how tiles are laid on a concrete slab, you'll have a good picture of the basics.
This variability almost always relates to the substrate, which is the surface upon which tiles are set. Most often it is a newly poured concrete slab which has already resolved grades that ensure proper surface drainage. But if tile is designated for older slabs, a combination of new and old, or other vertical surfaces, some correction of grades or special preparation of the surfaces may be required.
Step by Step Tile Installation
- Clear and clean surface.
This step is important with remodeling or job sites where the slab has been poured well before tiling begins. Remove all remnants of paint, oil, mud and dust. - Prepare thinset.
Thoroughly mix thinset according to the manufacturer's directions. - Spread thinset.
A trowel is used to spread thinset onto a small portion of the surface. - Place tiles; add spacers.
Gently press each tile into the thinset. Use spacers designated for the tile selected to ensure all grout joints will be of equal width. - Repeat steps 3 and 4 until entire area is covered.
- Let dry 24 hours.
- Mix grout.
Mix grout in a bucket by manufacturer's directions. - Spread grout onto tiles.
Use a grout float to spread grout reaching every joint. Continue spreading until every joint is full to the top. - Let dry 24 hours.
- Clean grout.
Use a sponge to wipe down tiles with warm water to remove all grout haze on the ceramic surface. - Wait 72 hours, then add grout sealer.
Allow 3 hours for sealer application to dry, then repeat 3 times. Where tile must be sealed as well, this tile sealer will also cover grout.
Jeff Dizmon, a certified tile advisor stresses the importance of the substrate, which is the concrete slab that includes expansion joints and sometimes cracks and other irregularities. Often the substrate must be adequately prepared to ensure the longevity of the tile. "That slab must meet minimum thicknesses and some may not meet regulations. The problem is that soil moisture can migrate up through the slab and into the thinset layer and grout joints. Moisture causes a lot of problems. It can change the tile color or mute it so much it loses its original appeal. Moisture that moves into grout can foster mold and darkening color. To prevent this you need membranes and sealers as well as special grout with epoxy."
Dizmon also explains, "A patio slab that has heaved or pitched or cracked must be prepared to accept tile. This can increase costs, particularly when the contractor is using high quality membranes and modified thinset. But even with these special treatments, those same forces that caused the heaving or cracks in the first place are still there and will, in time cause the tile to crack too. Above all, find a good tile installer and don't make this a DIY project.
Related Reading: Outdoor Tile
 Deck Tiles
 Pool Tiles
